Pages

Sunday 28 October 2012

Full Volume BIAB In Action

With the boil kettle build now completed I've managed to get 2 brews down while working out boil off rates to start hitting targets more consistently. The new system was christened with what is going to be my house ale (details on labels page), a golden ale generously hopped with Amarillo & Centennial hops.

To continue the trend of breaking in new systems, this batch was the first to be force carbonated & run through version 1 of my porta-keg setup on Bathurst weekend. There were a couple of issues with excessive foaming and a lack of carbonation but this will hopefully be rectified with the correct length of line fitted to the party tap.

Batch 2, a Weizen, is currently in the fermenter approaching final gravity. This batch will also be kegged & run through version 2 of the porta-keg system, which is still under construction, at the Adelaide case swap next weekend.

With many more plans in the pipeline on the brewing & kegging side of things including a system upgrade to 3 vessel brewing & possibly a RIMS setup, things are sure to get interesting over the next months.

Brew on!!

Saturday 18 August 2012

The Final Mini BIAB (For Now)....

With the completion of the 50 litre boil kettle the time has come to retire the trusty stock pot that I started my all grain brewing journey with. For the final brew I decided to finally brew up my entry for the November Case Swap Challenge, an Oatmeal Stout.

The brew started earlier this week with the preparation of a pack of liquid Irish Ale yeast.


After activating on Tuesday, the pack was ready to be split up by Friday. You don't have to split liquid yeast packs, and to do so requires a few other bits and pieces as well as a bit more time, but I found some dried malt extract to use in starters so I split this pack into 5 vials to use in a few different recipes that I have planned.


5 x 25 ml vials of Wyeast 1084 Irish Ale yeast

After managing to keep the mash temperature fairly constant, with only a few degrees lost over the hour, the trusty three ring burner got fired up to get up to boil temperature. While this was going on, I started work on my next project, the party porta keg (more on this later), and weighed out the hop addition. I opted to go with Fuggles purely because I had more of these in the fridge than other suitable English hops.

25.95g of Fuggles goodness

After almost having a boilover, the hops went in for the hour boil. I managed to hit all target numbers, but probably could have boiled a little harder. For those playing along at home, the recipe that I used for this batch is below;

Ingredients

Grain

1.85 Kg - Marris Otter Ale Malt
0.33 Kg - Flaked Oats (Quick Oats)
0.20 Kg - Pale Choc Malt
0.17 Kg - Biscuit Malt
0.10 Kg - Roasted Barley
0.10 Kg - Crystal Malt, Medium

Hops

26g - Fuggles

Yeast

25ml Wyeast 1084 Irish Ale yeast - Stepped in starter to approximately 94 billion cells

Pre Boil Gravity - 1.040
Post Boil Gravity - 1.051

Est. Final Gravity - 1.012
Est. ABV - 5.1%
Carb Level - 2.0 Vols

Sunday 12 August 2012

The Completed Boiler

After a couple of weeks delay, the boiler has finally been completed. All parts have now been fitted with the only things left to do is make sure that bulkheads are properly sealed and then run the first batch through the new system.


I have added a pick-up tube to the internal side of the ball valve and a plug to fit into the top of the T piece that the thermometer and sight glass are screwed into. While the plug may not be necessary, it has been known that the polycarbonate tubing used in the sightglass can crack or shatter when heating water for cleaning after a brew. For the relatively cheap cost of a plug it's easier than replacing the tube and remarking the litre increments if it does break.

The Fittings


Ball Valve with Pick-Up Tube attached

T- Piece for Thermometer & Sightglass (Stainless Plugs fitted)

Internal Shot - Pick-Up Tube fitted to Ball Valve & Thermometer Fitted to T-Piece

Now that the build has been completed there are a couple of things that I have learnt for future builds.
  • Drilling bulkhead fittings - To drill out the holes for the bulkheads I used a stepped drill bit. If I was to do this again, I would probably opt for a Tungsten Carbide holesaw. While they are a bit dearer, there is a chance of burning out your drill or, as happened to me, snapping the screw that secures the chuck to the drill motor. What I saved on the stepped bit I'll now be spending on a replacement drill. Alternatively, your local homebrew shop, or metalworking business, may be able to drill these out for you at a small fee.
  • Buying Fittings - Always make a list before going shopping for parts. Seems simple enough, but I ended up making two trips out to the other side of town instead of getting everything in one hit. While this wasn't a major inconvenience, getting everything in one trip would have had things done a lot sooner.

Thanks again to the guys from BrewAdelaide for their assistance and tips for the build. Now onto the next mini project for the brewery, the Garden Sprayer Porta-Keg. Further updates to follow as this one progresses.

Happy Brewing!!!


Sunday 22 July 2012

Getting Into All-Grain & Building The Brewrig

So many configurations to choose from and so many shiny things to buy. 3V, 2V, Single Vessel, HERMS, RIMS, Gas & Electric, the list of choices and parts seemed to be endless. Due to the fact that my DIY skills are somewhere near to non-existent I decided to go down the path of the simplest setup I could find that would still give me good beer.

The system that I decided on was a single vessel, gas fired BIAB (Brew In A Bag) setup. My first few brews in the world of AG were mini batches brewed in a 19 stockpot purchased from Big W with a brew bag, resulting in 9 - 11 litres of beer. While this method has served me well, the smell of malt and hops throughout the house after brewday was never well received.

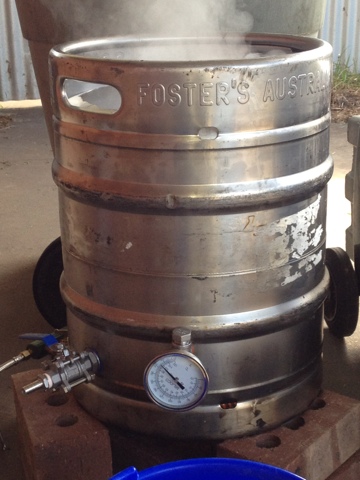
The construction of the brewrig began with the purchase of a 3 ring gas burner so brewing could take place in the shed. Brewing has continued in the trusty 19 litre pot while searching for a decently priced brew kettle and the associated parts to get the setup running. After a few weeks of searching EvilBay, hospitality supplier & brewing supplier websites the perfect kettle was found without costing a kidney - and so the build began.

Again, there are a multitude of ways that you can setup your kettle, I chose to take the weldless path, mainly to avoid burning the shed and house to the ground. The first purchase was a weldless bulkhead to fit 3 piece ball valve* for ease of draining, followed by a T-Piece fitting to fit a thermometer and sight glass.

To fit the bulkheads, you can either drill out the holes yourself, or there are sure to be local businesses that can do this for you. If you plan on doing this yourself, I used a stepped drillbit to start from a 4mm hole to go to a 24mm hole. Once the holes is drilled, use plenty of cutting lube and go slow with the drill, simply secure the bulkheads with a locknut and silicone washer on each side of the kettle wall and you're in business.

Ball valve fitted to kettle with weldless bulkhead

Many thanks to Malted, BigDaddy, Vortex, Raven19 & Hammer from BrewAdelaide for all of their assistance, hints and tips on the process of drilling the kettle and the best parts to use.

Parts for the kettle build were purchased from the following suppliers. For the record, I have no affiliation to any of the businesses, purchasing decisions were based on best price only.
  • 3 Piece ball valve - Ebay
  • Stepped drill bit - Ebay
  • 50mm bukhead for valve - Beerbelly
  • Sightglass, Thermometer & T Piece - WeldlessFittings.com
  • Cutting lube, Masking tape - Random hardware stores
The rig is now almost complete, pending the arrival of the threaded thermometer to fit the T-Piece, and it's now just a matter of deciding on the recipe to break in the new boiler.

Further updates to follow as the build progresses, new recipes are formulated and new beers are consumed.

Cheers,

The Mad Scientist

* There are a multitude of choices for valves - 3 piece, 2 piece, full bore & reduced bore. I went with the three piece to make cleaning easier.